Recently I have decided I want to have 'cleaner' tables for my games; that is, I want more of a stylized look over trying to create every rock, stone and twig. For starters, it's hard to do the latter, and secondly, it never feels like I capture what I want to do. To me, it's starts with getting some buildings that aren't rubbled, that look nice, and have a WW2 European look to them, not fantasy gabled cottages. And while the buildings I made for Mordheim 12 years ago are cool, they are all 'destroyed' and do have the fantasy look about them. Though, a few can double for European buildings, I guess.
So, the hunt was on for what I wanted. I searched the interwebs and found literally dozens of companies that made buildings (and other terrain), that met my qualifications. However, problems arose. Mostly price. I'm a gamer on a budget, and typically, when I buy gaming things, I'm usually buying that and not medicine. (Hey, we all have to die of *something*, right?)
Plus, I didn't want to have to paint the things. Assembly was okay, but I did not want to spend hours trying to paint the damn things. 4Ground was the obvious choice. They have great stuff and everything you can think of. I own several small ruined houses of theirs and they are great. Unfortunately, I would have to hit the lottery to go that route. That's not a slam on 4Ground by any means; their stuff is great, but I decided I just couldn't swing it financially.
I kept coming back to Sarissa Precision though. Kept seeing their stuff on other blogs, kept looking at all their really cool lines of products. And their prices were right in my wheelhouse. But I'd have to paint it!
Then something just clicked. It hit me, I actually *enjoy* modelling. WTF? That's why I am in this hobby to begin with, right? I love assembling and painting little toy soldiers, why not the houses and buildings I want. I decided to embrace the project instead of fear it.
So, I decided to pull the trigger. I ordered 3 buildings: A corner 'terrace' house, a shop and a another terrace house that all fit together. And get this: all three were $66. To compare, the corner house alone from 4Ground is $68! But it *is* painted and looks great out of the box. Still, three buildings for less money. A no brainer.
Shipping from England was $3.44, again, shipping from 4Ground was $26. I ordered last Thursday evening and the package was on my porch when I got home form work on Thursday afternoon.
So, here's the package:

The contents. The shutters are actually thick paper and the rest is MDF. (Whatever the fuck that is). When I was young, we called it masonite. Anyway, it's the same stuff on the back of old clipboards.

I decided to paint some of it before assembly. I wanted to test it too. I had heard horror stories of the stuff soaking up paint and needing 4 or 5 coats to cover it. I wondered if tempera paint would be better, though I've never used it. After consultation with my brother Tony, I decided on acrylics and got to work. I didn't prime it because then I would lose the details. I wasn't worried too much about cracks in the plaster, but I didn't want to lose the bricks or roof slates.
I never liked my terracotta color and eschewed it for 'red leather'. I also used a 'tan' for a few lighter bricks. Looks good to me.

The slate was done with 'black grey' with lighter touches of 'cold grey'. Luckily, for both the bricks and roof slates, I am good at coloring in the lines.

Here's the two stories and roof assembled with wood glue. The roof was a little tricky and I am not happy with the seams up the front of the building but there's nothing I can do about it.

The whole shebang, unpainted.

After textured painting, rough coat. I've never done this before but I added genuine Deerfield Dr. dirt I brought with us when we left civilization. It's the same soil I use for my bases. I plastered it on pretty thick, hoping it wouldn't soak in too much.

The back. Duh.

Here' the pretty much finished product. I went back and forth about painting the shutters. I had a real light green in mind but ended up just leaving them as is. I may paint them in the future but for now this is what I went with. Also splashed paint on the chimneys to make them look like stone. I'm not sure the brick color would have been better; maybe on the next one.

See that damn seam?
Plus, you know, it always seems to me that projects look better in person. The camera picks up a lot of what my eye doesn't see. I think it looks pretty good for a first attempt.
Also, I wanted to make it look like it wasn't brand new, freshly painted. I toyed with using all the washes and inks to age it but finally decided since some of the paint *did* soak into the MDF, that instead, I would apply liberal amounts of paint elsewhere to highlight the darker areas. Again, I am trying to be more stylistic than exactly accurate. I hope this makes sense. It just breaks up the regularity of a perfectly painted building.
Oh yeah, it came with doors but I am not sure if I want to permanently affix them.
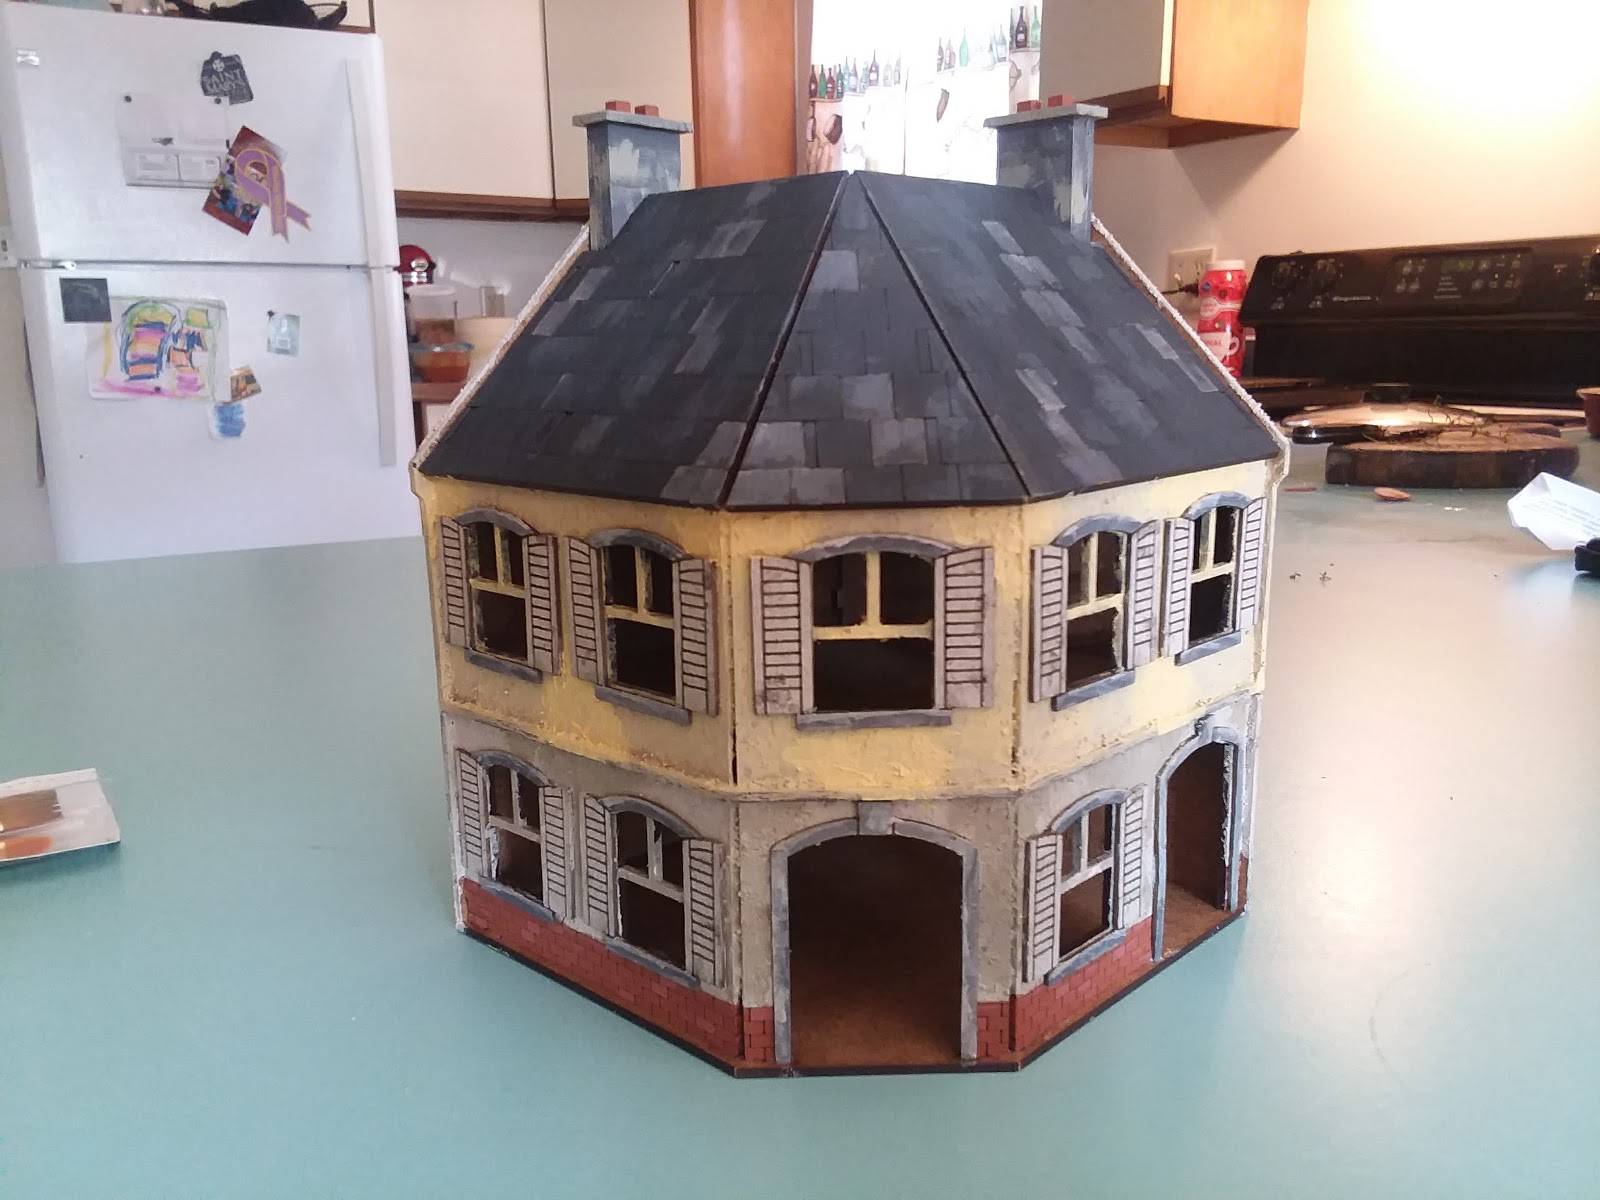
In that same vein, here's a shot of the finished project from eye level when it will be on the gaming table. Looks nice, in my opinion.

So, maybe the coolest thing of all is that when my wife freaked out about me spending more money on gaming stuff, I told her they were for under the Christmas tree! Of course, now I have to set up a 28mm village under the tree. I just hope she doesn't mind if my Americans are attacking the occupying fallschirmjagers.

1 comment:
Excellent work. You could use wall filler (spackle) to fill the seams before you start with the sand. I do it with all my MDF buildings.
https://gregswargamingblog.blogspot.com/2017/03/weathering.html
Post a Comment