Saturday, February 2, 2019

Stalingrad, Bolt Action, Take 2

This was the second playing of our 'Stalingrad' scenario. OoB's were essentially the same but one AFV was removed from each side (just for simplicity sake.)

Taking the lesson from the first playing, we switched the board from long wise to short wise with the rest of the scenario being the same: destroy the enemy's CP before they destroy yours. Some of the terrain needed be switched to provide each side with upper storeys for a bird's eye view.
Interestingly, though I was the only player common to both games, strategies were almost identical. I am not sure if that is a good thing or a bad thing. With only two playings, it could be mere coincidence. But, it could also be a signal of a design flaw as players feel there is only one option. We'll never know.

For newbies to this blog, we do not play BA as the tournament game it is designed to be, but rather as a scenario driven game. For more on this, if you should give a flying fuck at a rolling donut, see the previous post for more details. If you just like looking at the pictures, please enjoy. Geek porn at its finest.


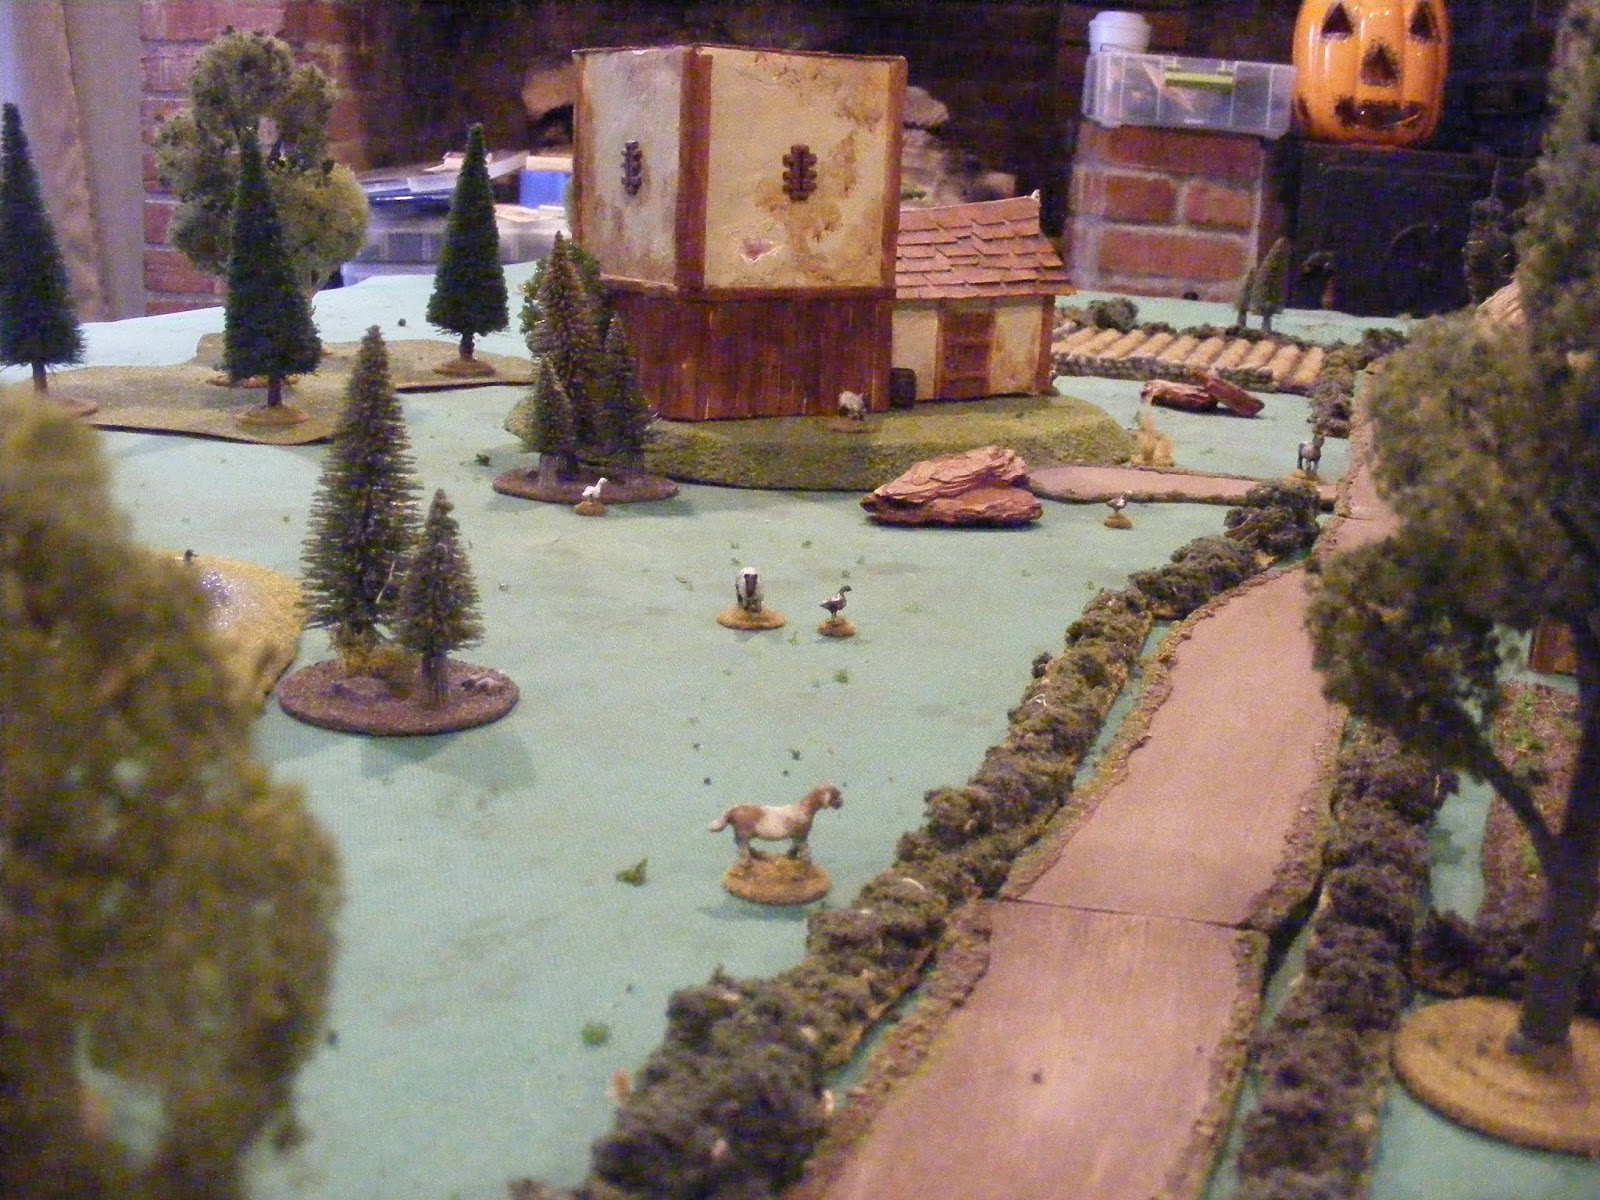
The table with initial set ups. You can see both sides poised to enter the main factory. It's interesting. That factory really held no specific tactical importance except a spot in the center, yet both sides, both games, were determined to control it. In retrospect, it would seem a token resistance there would deny the enemy it's benefits, while one could use the valuable resources elsewhere. 


German Heer squad ready to dash across the open streets to gain purchase in the central factory.


The German HQ centrally located at the tip of the spear to lend morale boosts to the assaulting forces. The Pioneres are in the top right.


On the other side, the Soviets' two tommy gunner squads are being exhorted by their Kommisar to disallow the Gerries ingress.


Fuck, those guys are handsome, and fit looking!!!!!!


The Chermans have a foothold, but the tommy gunners, with LMG's, are ready to give them what for.


Soviet eyes in the sky. Both the OBA observers and spotter for the 81mm mortar choose the top floor of the worker's apartments for their hide.


Boom! Soviet artillery is spot on again, and again (!) fails to directly hit any unit but still passes out Pins on the Germans like so many corsages on heaving Prom night breasts! (God, I hope that offends someone!)


Damn, that was close, Hans! ( I so wanted to say 'Fritz, they shot Fritz!', but not a single casualty.)


I made the damn explosions, I'm going to post pictures of them.


To follow up the barrage, the tommy gunners got the first opportunity to murder a squad of Gerries in the factory: the Pioneres, no less. 10 tommy gunners and a LMG open up at close range. An incredible total of 23 shots needing 6's to hit! Sigh... nearly one. This, coupled with the OBA's inability to take anyone out, really set the tone for fight in the factory. It became a 5 turn slug fest, with each side just mauling the other, whilst feeding more and more units into the fray. It was satisfying in a way, as it mimicked so much of the real fighting in the city. Dying by the half squad: the story of Stalingrad.


Strike while the iron's hot. Too bad there were dice involved.


A Soviet T-34 enters the board, hunting for targets of opportunity.


Welcome to Stalin's city. We decorated it just for you.


Still the battle rages in the factory and still the T-34 looks for bigger game.


Be careful what you wish for Comrade.


Also, similar to the last game, the Soviet rifle squad is tasked with eliminating the enemy CP. They would get no closer than their predecessors. They advance up the left flank making good use of cover. So far.


A look from the German side with all units bearing the red badge of courage. Or Red Badge of Pinning, in this case. Unfortunately for Gerry, the air observer was whacked before he had the chance to call in the Stuka. It could have tipped the balance in a fight like this.


The StuGIII opens fire into the factory while the T-34 tries to sneak a shot from around the corner. Each AFV was ineffective. This was a PBI shit sandwich from the opening move.


Just like last week, the Germans reveal an identical ambush. One Heer squad...


...and the MMG open fire on the rifle squad approaching their position, thus ending the only Soviet threat of the evening.


As close as they would come. Lookie the Germans across the yard, safe in the building, behind barbed wire, etc...


I just like these guys, it was they who took out the German Luftwaffe observer. No smoke this week, however.

So, two playings, two draws, but I hope two times the fun. It was a lengthy project in the making but worth every minute, if the guys had half the fun I did playing. 

As mentioned, both games were very similar in tactics and outcomes, still not sure why, or if it matters.

Further similarities include the Pak40 never firing a shot, this time neither did the Zis3 (and only once last playing.) This would seem to either make the guns superfluous, or the players very canny. 
In both games, the Soviets chose to use their Fanatic conscripts *and* their MMG to protect the CP, and in both games, neither fired a shot in anger as the Germans never got close enough for them to spring their ambush. In my head, I had imagined the conscripts being used in CC as they will almost certainly maul any unit on the board with their Fanatic bonus.

I think next time, when we bring the game to New York for my brother Tony, who wasn't able to make it in, it would be interesting to try and not spend so many resources in the center, as counter intuitive as that may seem. Maybe even better, change the layout so the big factory isn't *in* the center. That's an option that just occurs to me, though it has probably occurred to the astute reader already. That is the affliction I live with.

Regardless, we play games for fun, and I think we succeeded on that count. Many thanks go to all the players across two states who made it so enjoyable for me. Special thanks again to our hosts, Mondo and Chris, who graciously open their homes for us to invade.

Wednesday, January 30, 2019

Stalingrad, Bolt Action, Take 1

In Pittsburgh for a rousing East Front game of Bolt Action*.

* Mind you, we do not play the rules as written per se, but rather use the fine mechanics to run our own scenarios using common sense replacement rules for those solely intended for tournament play. Eg: vehicles can move up to their movement limit and don't have to adhere to any 'one wheel' rules mechanism. If you got 9" of movement, you can do whatever you want with it. (I know if I had 9" I would certainly use it.) Same goes for 'hidden' units. When we play they are actually hidden (and in Ambush), not on the board, being recorded on a separate sheet. If you can't trust the guys you play with to do this, get a new group of friends to play with.

Points were about 1300/1400 a side, also with no restrictions as per the rule book. (Each side had two AFV's.) Squads were put together historically, based on real Orders of Battle from Stalingrad. We also use 1st Edition rules with a few exceptions; the new rules which actually have a purpose, like HQ's improved functionality, and 18" range for assault rifles, are used.

So, if you're a purist... this report may make your butt pucker. Either way, please read on and enjoy the game.


The table. 

Each side marked their Command Post and went after the other side's. A big game of Capture the Flag.


The lone Soviet rifle squad embarks through the ruins, using the cover of the wall, to destroy the enemy CP.


Oh yeah, these guys. And yes, we take gaming seriously, so it is a formal occasion for most. 


A PaK40 sits in wait. It is not 'hidden' as it is not in concealment terrain.


The main Soviet thrust heads towards the central ruined factory. The point of the spear is comprised of two squads of tommy gunners, each with a LMG. The medic rightly accompanies them.


German Pioneres use cover to avoid a machine gun nest in the upper storey of the worker's apartments. Still, a few would fall victim to the Soviet gunner as they advanced through the rubble.


Soviet OBA comes in on the first attempt, catching several units in the ruins of the factory!  The HQ and FT teams are pinned massively, but luckily no German units are directly hit, else they would be so many spare parts.


But what's this? The German Stuka comes screaming into the mix at the same time, causing an even bigger scene of indescribable hell for those on the ground.


Another shot of the Stuka peeling off after wreaking havoc and madness on friend and foe alike!


The result of OBA and a Stuka arriving at the same place and same time.

PS: I *KNOW* the camo is wrong on the StuGIII. Get over it.


And still the rifle squad presses forward through the foundry.


The aftermath of death from above: not a whole lot of anyone left in the big factory.


Finally, just as they approach the enemy CP, the ambush is sprung on the Soviet rifle squad. A squad in Ambush opens up from point blank range, catching them in the open.


As close as anyone would get to their objective, the rifle squad meets its end, as the Germans also unleashed their MMG from the building just out of this shot. (And also the one with the CP.)


The Soviet mortar fired round after round of Smoke before finally managing to blind the PaK40. But by then, it was too late. The infantry were decimated without armor support.


After taking out one of the T34's, the StuGIII is also done for by a Zis3 as the Soviets say 'nyet'.


The German air observers would get no more sorties out of HQ this day.

And so, like so many other days in Stalingrad, the day ended in a draw. So many dead, and for what? For twenty, thirty meters of scorched earth? Tomorrow, it starts all over again, maybe not here, but elsewhere in this city; more dead, more destruction, and for what? In 75 years Alabama and Clemson are going to ruin college football, so what's the point? Sigh...

So, neither side got very close to the others CP. The Soviets got closer but were mowed down to a man. The Germans didn't lose very many dudes but didn't come within 18" of their objective.
The guys suggested turning the table and running the game across the short end. Sounds reasonable (but ultimately didn't work either.)

Thanks to yinz that came, and a big thanks to Mondo for the use of his home and all the great food!

Thursday, October 25, 2018

Sus Bellorum Britanniae

Ah, Pig Wars in Britain.

Friends and family gathered to play a Dark Age brouhaha over the weekend past. The game was Pig Wars; the scenario pitted numerous wandering warbands bent on pillaging a Roman villa in 5th century Britain. Food on the hoof, and who doesn't like killing bloody Romans?
There were 5 warbands and 5 starting points. Each warband was slightly different, but each offered  aspects to make them attractive to the players, from extra shooting, to mounted troops (an attack bonus) to guys with two handed axes. What we did was randomly determine 'picking order' for the warbands and then reversed the order for picking starting points, ala Settlers of Catan. So Nat had the first choice of warband but the last choice of his starting point.
Each warband would be awarded points for getting livestock off the board and killing dudes, plus score points for secret Victory Conditions I invented, also randomly selected. Some examples of the secret VC were extra points for killing 'a guy with a chicken' or extra points for 'killing guys on the roof of the villa *if* you exit a goat', and so on.
I would play the Romans again who were there only as obstacles to the players' designs and could score no points of their own.

We also added a new dimension: we used old Warhammer direction dice to randomly move the farm animals each turn. That way, they didn't just sit there and wait to be picked up. It worked out pretty well, as they sometimes would run in a different direction just as someone was about to grab them. Just an extra bit of fun.

So, each player having selected their warband and starting point and armed with a special purpose, let's get started!


The villa. I picture it wet and muddy, like I do the entire earth from the 5th til the 15th century.


The 'house' and barn. More of a barracks than a house, it would be revealed as the game wore on.


The fortified manor house. In hindsight, it would need a lot more fortification.


Tony, Nat and Ogre Dirty Dog fondle their warbands, getting ready to high tail it onto Roman property without so much as an invite.


Tom aka 'Thakules' also sets up his warband. His guys would prove, let's say, opportunistic, as they strolled into battle and cleaned up the remnants of several bitter conflicts.


Tom's troops moving inexorably forward. (That's Latin for 'slow'.)


Chris' warband schleps through the muck. That duck never knew what hit him.


Ogre DD's warband has no qualms about ruining anyone's day. The  head straight for the barn and the highly prized horse.  


But the barracks reveals the first of the sleepy Roman defenders forming a shield wall to stop them. Unfortunately they had no time to don their armor.


Not so these boys. The Roman centurion and his Legionum Sanguine Fructos forms up outside the villa. They are sick of this provincial life and welcome a fight. Careful what you wish for, fellas.


Nat's warband comes in waves. They lost a few guys on the way in to bow fire but were on a mission.


The Romans engage Ogre, providing him with many victory points as they were apparently swinging nerf swords and were pretty much butchered, setting a frightening precedent for the home team.


Nat's shield wall closes with... a sheep? 


Wait for it... 


What's left of the Roman shield wall runs for his life. There was another 4 man shield wall hiding in the barracks but Ogre smashed them as well, leaving a lone peasant holding his chicken.


Less archers on the roof than a few turns earlier. Those guys were arrow magnets while they lived.


An important shot. This is Chris' guys about to exit a chicken, a goose, a duck and a sheep, which is 4/5ths of his secret VC. For a whopping 7 points he needed to get each of the above off, plus a goat. He did it too, through careful negotiation and a non-aggression pact with Ogre. (Until he reached his goal and then turned on him.) Well done Chris!


Nat's armored shield wall clashes with the Legionnaires. His two handed axes would break the Romans until they were fighting in a few separate knots. 


Wait for it...


Now! 

Tom's warband gets into the fray, cleaning up what's left of the bloody Romans. (The dirtiest kind.) The Roman centurion finally goes down after a Popeye/Bluto type fight with Nat's war lord.


Tony moved his warband in well measured temperament.


Two Saxons fight over their girlfriend. 


Final positions, not too many dudes left. You can see Chris' and Ogre's warlords engaged in mounted combat between the barracks and barn and Nat's and Toms also engaged in front of the villa. Lots of warlords took wounds but only mine died. :-(
But, the Romans had one guy survive! The priest was hiding in the villa and no one entered to brain him.


It was a close run thing. After tallying the points, Ogre Dirty Dog emerged victorious, edging out Chris by a single point. The rest of the pack were separated by 6 points and first and last place separated by only 11 points. Very close and well played by everyone.

Pig Wars is a great 'convention style' game. It allows multiple players to have a good time. The use of playing cards over dice is a great equalizer as well. It's an old game but holds up well. We recommend it.

Else, how can you answer the question when you are an old gaffer and you grandchildren ask: 'What did you do in the Pig Wars, grandfather?'